Value
Wednesday, September 30, 2015
Sunday, September 27, 2015
Thursday, September 24, 2015
Semester Project #1 Reminder & Guidelines
This can be a short paper OR a brief oral presentation (use of
PowerPoint is encouraged)
Choose a work
of art—a painting or a drawing—to analyze from the period of history you are
currently studying at home. The piece should relate to a significant event,
idea, or movement of that time. Try to pick something you haven’t previously
studied.
Things to include:
- a brief introduction to the time period or event you are studying (what was going on at the time of the EVENT DEPICTED in the painting?)
- the artist (who painted it? where was s/he born? when? where did this person learn how to paint?)
- a description of the art work itself (when was it painted? with what material? on what type of media?
- an analysis of how the artist used various elements of art its design (so far, you've studied space, line, texture, shape, form, and value). How did the artist use these elements in the painting? (you don't have to explain how every single element was used or not used)
- an explanation of how this particular piece has influenced historical perspective about your subject.
Your focus should be on analysis and
explanation.
Project is due: October 8, 2015
Students will either
read their papers aloud (visual aids are encouraged) OR give their oral
presentations to the class. Presentations will be videotaped (optional) and
made available to the student within a week.
For example: the painting of George Washington crossing the Delaware. This painting romanticized the crossing which actually took place in the middle of the night...The focus is on the military strength of Washington and his determination. When people see this, they will imagine...
ART: WEEK 6
Home-work for the weeks of September 24 - October 8, 2015
Assignments Due: October 8, 2015
WEEK ONE (September 24-October 1, 2015):
Work on homework assignments (see below)
WEEK TWO (October 1-8):
Work on Semester Project #1
Remember, if you have any questions about these assignments,
please contact Mrs. Z at mrsz@gmx.com. Don't wait until it's too late!
INSPIRATION
Read pages 49-57 in Art and the Bible by Francis Schaeffer. Be sure to highlight or copy down any quotes that resonate (click) with you, and be ready to share your insights in class.
VOCABULARY
The vocabulary lists are now on Quizlet. With your parents' permission, click here to add yourself to the class and use the flashcards to learn this week's terms.
Click here to join the class: https://quizlet.com/join/tJ49SA5AG
You will have a quiz on these terms/concepts next week. You should be able to match words to their definitions and how to identify each concept in a drawing.
TIPS & TECHNIQUES
It takes practice to select the right value when looking at something in color. Sometimes it helps to convert the image to "grayscale" in order to show the values more clearly.
** Remember: Drawing is 50% observation ***
SUPPLEMENTAL VIDEO FOR WEEK 6:
Are you choosing to draw objects you think are interesting?
PRACTICE DRAWING
Pay close attention to the use of value in each of your drawings this week, but do not neglect the other elements you've learned so far: space, line quality, texture, shape, and form. You should spend around 30-45 minutes on each drawing.
DAY ONE: Draw an egg based on the instructions in the video we watched in class and using the photo handout as your reference. Remember to shoot for a full-range of value in your drawing. Develop the background by using cross-contour lines that contrast with the egg. Don't be afraid to take chances and embellish your composition by trying new things!
DAY TWO: Complete two Value Shading Worksheets — one with graphite, and the other with a colored pencil(s) of your choice (use only one color per object).
DAY THREE: Draw an interesting object. Be sure to show the full value scale in the highlights and shadows of your composition. Pay attention to the local values of your object and its surroundings. Remember: Local values are flat areas, each area with its own value. (Example: light hitting chalkboard and wall at the same time.)
DAY FOUR: Draw an interesting object that is receiving one direct source of light. If you choose to draw outside, do it in either the morning or afternoon. Noon is not a good time to draw outdoors due to the sun's brightness which could cause the values to wash out. Look for light and dark values and show them in your drawing. If you want to, try to imitate the extreme contrasts you would find in the Chiaroscuro technique we studied in class.
Wednesday, September 23, 2015
Why Am I Teaching an Art Class?
Have you ever wondered why I decided to teach an art class this semester? I prayed about what to teach, and God put it on my heart. I could not shake it. I was asked to pray about teaching Spanish (which I have taught before), and no matter how I prayed, I could not shake the feeling that I was supposed to teach this art class. God has gifted each one of us for His service. For example, some are teachers, some are engineers, some are artists, and some are engineering teachers who paint on the side! :) Our purpose is to respond to the call of God on our lives and do what we were created to do.
Why Christians should Paint, Dance, Quilt, Act, Compose Music, Write Stories, Decorate Cookies, and participate in the Arts
"Whatever you do, do all to the glory of God."
1 Corinthians 10:31b
Why Christians should Paint, Dance, Quilt, Act, Compose Music, Write Stories, Decorate Cookies, and participate in the Arts
Thursday, September 17, 2015
ART: WEEK 5
Home-work for the week of September 17-23, 2015
Assignments Due: September 24, 2015
Remember, if you have any questions about these assignments,
please contact Mrs. Z at mrsz@gmx.com. Don't wait until it's too late!
Assignments Due: September 24, 2015
Remember, if you have any questions about these assignments,
please contact Mrs. Z at mrsz@gmx.com. Don't wait until it's too late!
PROJECT #1: ART AS HISTORY - PROJECT TOPIC DUE!!!
You need to let Mrs. Z know what piece of art your first project will be covering.
Please email it to her asap. Thanks!
INSPIRATION
Read pages 40-48 in Art and the Bible by Francis Schaeffer. Be sure to highlight or copy down any quotes that resonate (click) with you, and be ready to share your insights in class.
VOCABULARY
The vocabulary lists are now on Quizlet. With your parents' permission, click here to add yourself to the class and use the flashcards to learn this week's terms.
Click here to join the class: https://quizlet.com/join/tJ49SA5AG
You will have a quiz on these terms/concepts next week. You should be able to match words to their definitions and how to identify each concept in a drawing.
This week's art focuses on the illusion of form:
![]() |
| "The Creation of Adam" by Michalangelo. Fresco. c. 1512 Here is a close-up of the hands: |
TIPS & TECHNIQUES
"The most important part of the still life are the
subjects you choose to put in it. Choose subjects with interesting shapes
and/or textures. Choose something familiar." Brenda Ellis
** Remember: Drawing is 50% observation ***
Here's a great example of variations in lighting and how it affects the shadows on an object. Pay close attention to your light source when you're drawing. Experiment with either moving your light source, your object, or your own position (perspective). Find the right shading for your drawing, and then go for it!
![]() |
| Click to enlarge. The STAR indicates the position of the light source. |
RECOMMENDED VIDEOS FOR WEEK 5:
>>> Click here to watch one of the videos on the element of FORM. Feel free to pause and rewind the video as necessary in order to complete the listening guide. <<<
Supplemental Video (make sure you've watched the video above FIRST):
>>> Click here to watch one of the videos on the element of FORM. Feel free to pause and rewind the video as necessary in order to complete the listening guide. <<<
Supplemental Video (make sure you've watched the video above FIRST):
Are you choosing to draw objects you think are interesting?
PRACTICE DRAWING
Pay close attention to the use of form in each of your drawings this week, but do not neglect the other elements you've learned so far: space, line quality, texture, and shape. You should spend around 30-45 minutes on each drawing.
DAY ONE: Draw a cube and label highlight, midtone, core shadow, and cast shadow. Draw a pyramid. Draw a sphere and label highlight, midtone, core shadow, cast shadow, and reflected highlight. Draw an organic form—this can be any non-flat shape. Pay attention to value and shading. Feel free to use different pencils to achieve lighter and darker values.
DAY TWO: Take a "mini field trip." Walk around the block or down the street with your drawing materials. Walk slowly & take time to observe things like an artist. Look for things to draw that have good visual qualities: interesting shapes, textures, or lines. Draw them. You can draw several objects on the same page. They do not have to be related. Fill the page with whatever you observe.
DAY THREE: Choose a simple form to study. Using a lamp as your light source, set up different lighting situations until you find the one you want to draw. It may necessary to block extra light (from a window or ceiling light) so that only the light source is shining on the object. Draw your observations.
DAY FOUR: Draw a group of still life objects following the instructions for choosing subjects (on your Vocabulary List), lighting, and background. Use line to describe form. Remember: When drawing multiple objects, select items that vary in size, shape, and texture. It also helps if you slightly overlap them. Whatever you do, make sure YOU like it! Your goal this semester is to develop your own style of drawing.
Friday, September 11, 2015
Shape (Review)
Here's a link to the brief introductory video we watched about Shape (posted for our class member who was absent yesterday): INTRODUCTION TO SHAPE
Thursday, September 10, 2015
ART: WEEK 4
Home-work for the week of September 10-17, 2015
Assignments Due: September 17, 2015
Remember, if you have any questions about these assignments,
please contact Mrs. Z at mrsz@gmx.com. Don't wait until it's too late!
Assignments Due: September 17, 2015
Remember, if you have any questions about these assignments,
please contact Mrs. Z at mrsz@gmx.com. Don't wait until it's too late!
PROJECT #1: ART AS HISTORY - PROJECT TOPIC DUE!!!
You need to let Mrs. Z know what piece of art your first project will be covering.
Please email it to her asap. Thanks!
INSPIRATION
Read pages 32-40 in Art and the Bible by Francis Schaeffer. Be sure to highlight or copy down any quotes that resonate (click) with you, and be ready to share your insights in class.
VOCABULARY
The vocabulary lists are now on Quizlet. With your parents' permission, click here to add yourself to the class and use the flashcards to learn this week's terms.
Click here to join the class: https://quizlet.com/join/tJ49SA5AG
You will have a quiz on these terms/concepts next week. You should be able to match words to their definitions and how to identify each concept in a drawing.
This week's art features organic (biomorphic) shapes.
![]() |
| "The Study of Two Plants" by Leonardo da Vinci |
TIPS & TECHNIQUES
"An artist can use the mind's ability to focus and see anything they want to see. When one sets his focus on a color or shape,
suddenly the color or shapes of things become very clear."
Brenda Ellis
suddenly the color or shapes of things become very clear."
Brenda Ellis
** Remember: Drawing is 50% observation ***
RECOMMENDED VIDEOS FOR WEEK 4:
Are you taking time to notice a variety of shapes in nature?
Are you looking at nature purposefully? Are you using the sight-measure method for precision?
PRACTICE DRAWING
Pay close attention to the use of shape in each of your drawings this week, but do not neglect the other elements you've learned so far: space, line quality, and texture. You should spend around 30-45 minutes on each drawing.
DAY ONE: Draw a hand. Use a hard lead to lightly sketch the hand using only geometric shapes. Once your shape is completed, use a softer lead to draw in your contour lines and texture. Refer to your handout if you need some help seeing the shapes in a hand.
DAY TWO: Draw a page of small objects while observing them. Take time to look carefully at the outside edges. As you look closely, you will see more and more, and your drawings will be more interesting.
DAY THREE: Go outdoors with a pencil and practice measurement on a variety of tree shapes. Use a pencil to measure the object visually using your eyes, not a ruler. Ask measurement questions as you make 5-minute sketches of a few trees.
DAY FOUR: Make a drawing using trees as your subject. It can be one tree or a group of trees. If it's a sunny day, try to find a spot in the shade where the sun won't be reflecting off your white drawing paper. Observe the trees directly by sitting near them, but far enough away that the entire shape is in view. Will your drawing fit better on the page if you turn it horizontally? Draw a few simple lines with the 2H pencil to place the objects on the paper. Measure the tree(s) using the sight method. Keep in mind the proportions of both the tree(s) and the surrounding area. Use the HB pencil as you continue to draw. Finally, add dark areas using a softer graphite pencil.
TIP ON DRAWING TREES:
In many types of trees, a branch does not decrease in diameter until it splits off into another direction.
Thursday, September 3, 2015
ART: WEEK 3
Home-work for the week of September 3-10, 2015
Assignments Due: September 10, 2015
Remember, if you have any questions about these assignments,
please contact Mrs. Z at mrsz@gmx.com. Don't wait until it's too late!
Assignments Due: September 10, 2015
Remember, if you have any questions about these assignments,
please contact Mrs. Z at mrsz@gmx.com. Don't wait until it's too late!
INSPIRATION
Read pages 25-32 in Art and the Bible by Francis Schaeffer. Be sure to highlight or copy down any quotes that resonate (click) with you, and be ready to share your insights in class.
VOCABULARY
The vocabulary lists are now on Quizlet. With your parents' permission, click here to add yourself to the class and use the flashcards to learn this week's terms.
Click here to join the class: https://quizlet.com/join/tJ49SA5AG
You will have a quiz on these terms/concepts next week. You don't need to memorize the definitions, but you do need to understand what they mean and know how to identify each concept in a drawing.
This week's art work features a wonderful variety of textures:
|
TIPS & TECHNIQUES
"When drawing or painting texture, it is important to
pay close attention to the values — they reveal the illusion of texture."
Matt Fussell
pay close attention to the values — they reveal the illusion of texture."
Matt Fussell
** Remember: Drawing is 50% observation ***
| This week, observe with your eyes AND your hands! |
Are you taking time to observe with your senses before you draw? While you draw?
Are you looking at and/or touching your object(s) 50% of the time?
Are you looking at your paper the other 50%
Are you using the full spectrum of value in your drawing to show texture?
Are you looking at and/or touching your object(s) 50% of the time?
Are you looking at your paper the other 50%
Are you using the full spectrum of value in your drawing to show texture?
PROJECT #1: ART AS HISTORY - REMINDER!!!
You should already be thinking about an event in history that you would like to study through art. Once you have your event, search for a painting or drawing depicting that event. Be sure to let me know your decision within the next couple of weeks. The sooner you choose your event, the better.
PRACTICE DRAWING
Pay attention to the use of space, line quality, and texture in each of your drawings this week. You should spend around 30-45 minutes on each drawing.
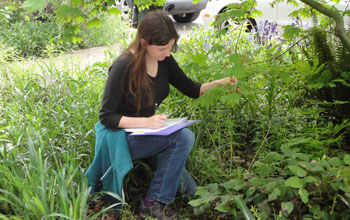
DAY TWO: Find 10 different textures you can physically touch. Touch it! Lie on it! Experience it! After totally experiencing these objects, draw one (or more) of the objects and its textures in a way that describes it, based on your experience with it. Feel free to use patterns to communicate different areas on the same object. Remember to bring this to class with you next week.
DAY THREE: Draw some objects that have interesting texture. Van Gogh seemed to use lines that flowed in the directions of what he was looking at. Every patch of plant life created a different texture. As you look at your objects, draw the surface. Try new ways of making marks.
DAY FOUR: Draw a landscape while looking at it — this is NOT blind contour drawing, but rather drawing it "live and in-person." This kind of direct observation offers a variety of textures for you to work with. Draw the textures you observe, using different kinds of lines and marks. Use the eraser as a tool to create white marks on a dark area.
Labels:
Drawing Techniques,
Texture,
Week 3


_-_Washington_Crossing_the_Delaware_-_Google_Art_Project.jpg)


.jpg)


